Invite and manage course participants
Invite people to a published course by email, then track who's registered, invited, and how each participant is progressing.
The Participants page is where you invite people to a course and keep track of who has joined, who's still pending, and how each person is doing.
You can only invite participants once a course is published. Until then, the whole Participants area renders blurred with a Cant invite participants alert and a Publish course button, and the Invite button itself is disabled. See Publish a course.
Open the Participants page
- Open a published course.
- Click Participants in the course sidebar.
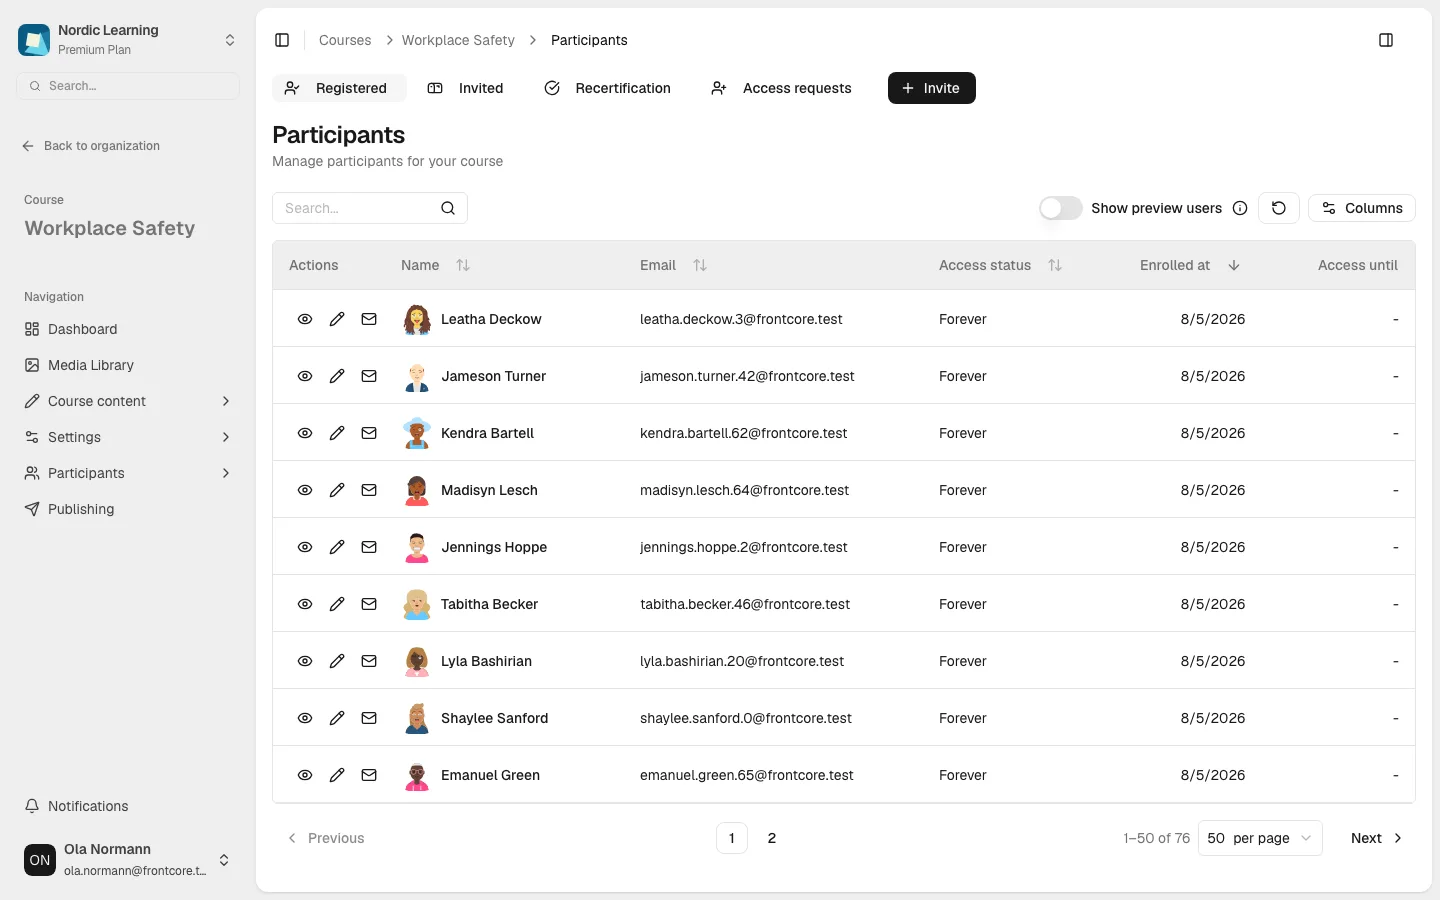
You land on the Registered tab, with a sub-navigation for Registered, Invited, Recertification (only shown if recertification is enabled for this course — see Set up course recertification), and Access requests.
Invite participants
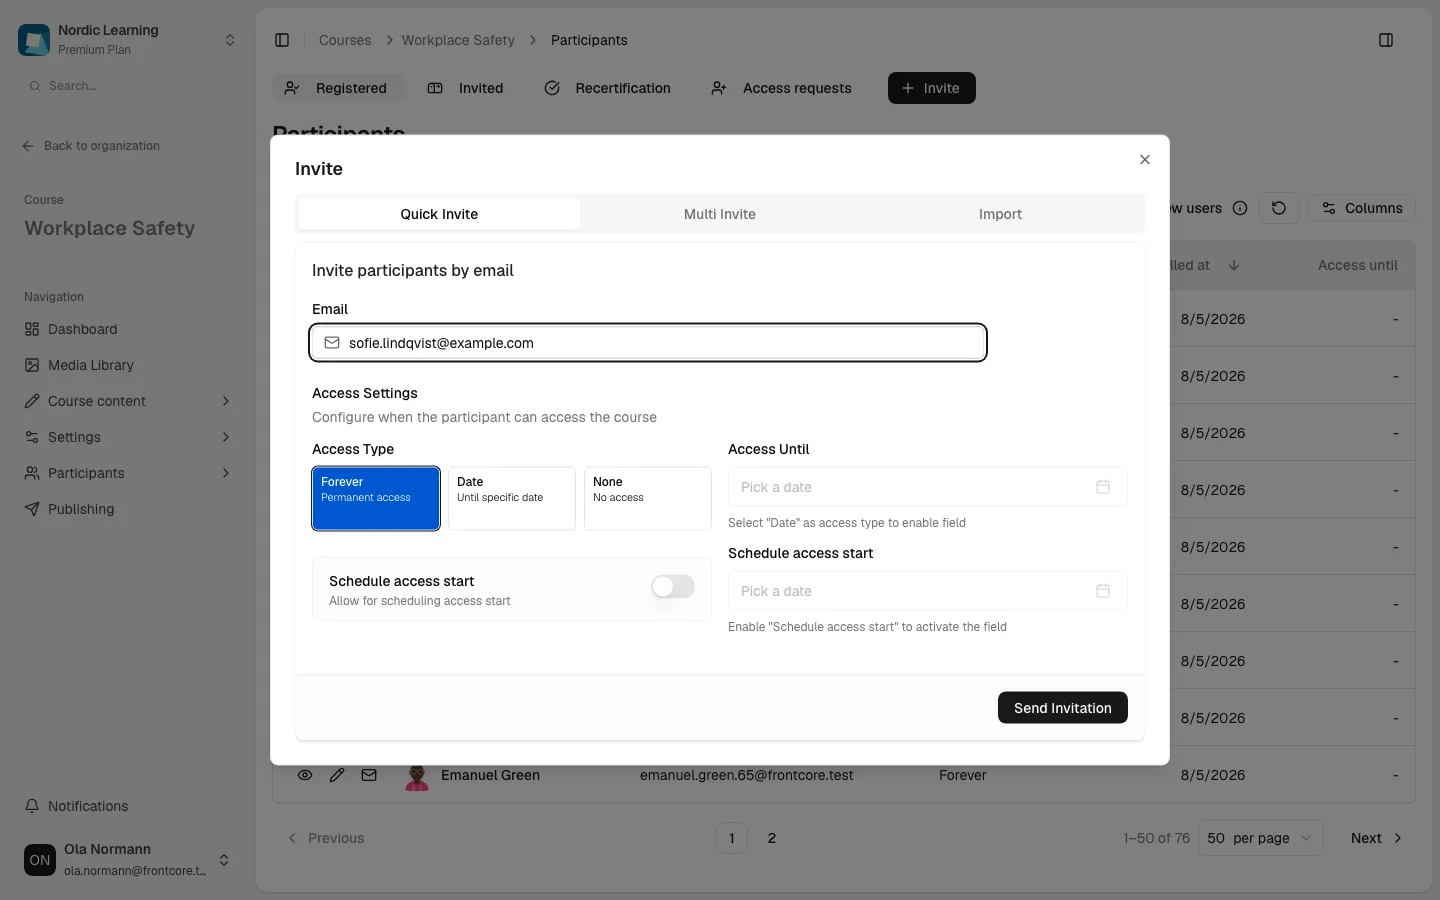
Click Invite to open the invite dialog. It has three tabs, and all three invite by email — there is no shareable invite link to generate and copy:
- Quick Invite — one email address at a time.
- Multi Invite — build up a list of people one at a time, then send them all together.
- Import — upload a CSV of participants.
Quick Invite
- Enter the participant's Email.
- Under Access Settings, choose an Access Type:
- Forever — permanent access.
- Date — access expires on a date you pick under Access Until.
- None — no course access.
- Optionally turn on Schedule access start to delay when their access begins, instead of granting it immediately.
- Click Send Invitation.
Multi Invite
Fill in the same email/access fields and click Add to table to build up a list — first and last name are also collected here. Each row can be removed individually, or selected and removed in bulk, before you click Invite to send everyone at once. Adding an email address that's already in your list shows an inline error instead of adding a duplicate row.
Import
Upload a CSV (up to 1,000 rows previewed per import) and map its columns to email, first name, last name, access status, access until, and access from. A Download CSV template link shows the expected format. Invalid rows (bad email, past dates, access-until before access-from) are skipped with a toast explaining why; valid rows land in the same reviewable table as Multi Invite before you click Invite.
If Default invitation options are configured in the course's settings, the Access Type and Access Until fields above are pre-filled from those defaults instead of defaulting to Forever. See Edit course settings.
Clicking Invite on the Multi Invite or Import tab always asks you to confirm how many people you're about to invite, even if the table only has one row. On success, you're taken to the Invited tab.
Bulk invites don't flag rows that couldn't be sent. If a Quick Invite email is already a member or already has a pending invite to this course, that single invite fails outright with an error explaining why. But in a Multi Invite or Import batch, an already-member or already-invited email is silently skipped — the dialog still reports "Participants invited successfully" as long as at least one other row in the batch went through. Check the Invited and Registered tabs afterward if you need to confirm exactly who was added from a batch.
Organization participant limits
Your organization has a maximum number of unique participants across all its courses, based on your plan: Free 30, Start 50, Mini 300, Pro 700, Premium 1500, Enterprise unlimited. Clicking Invite at 70% or more of that limit shows a warning first:
- Below the limit: You're approaching your participant limit, with View Plans and Continue anyway.
- At the limit: You have reached your participant limit, with View Plans and Close — there's no Continue anyway button, so there's no way to continue inviting from this dialog until you upgrade.
Both versions of the warning also show the same message: "Upgrade your plan to continue inviting participants without interruption."
The Invited tab
Shows everyone with a pending invitation to the course.
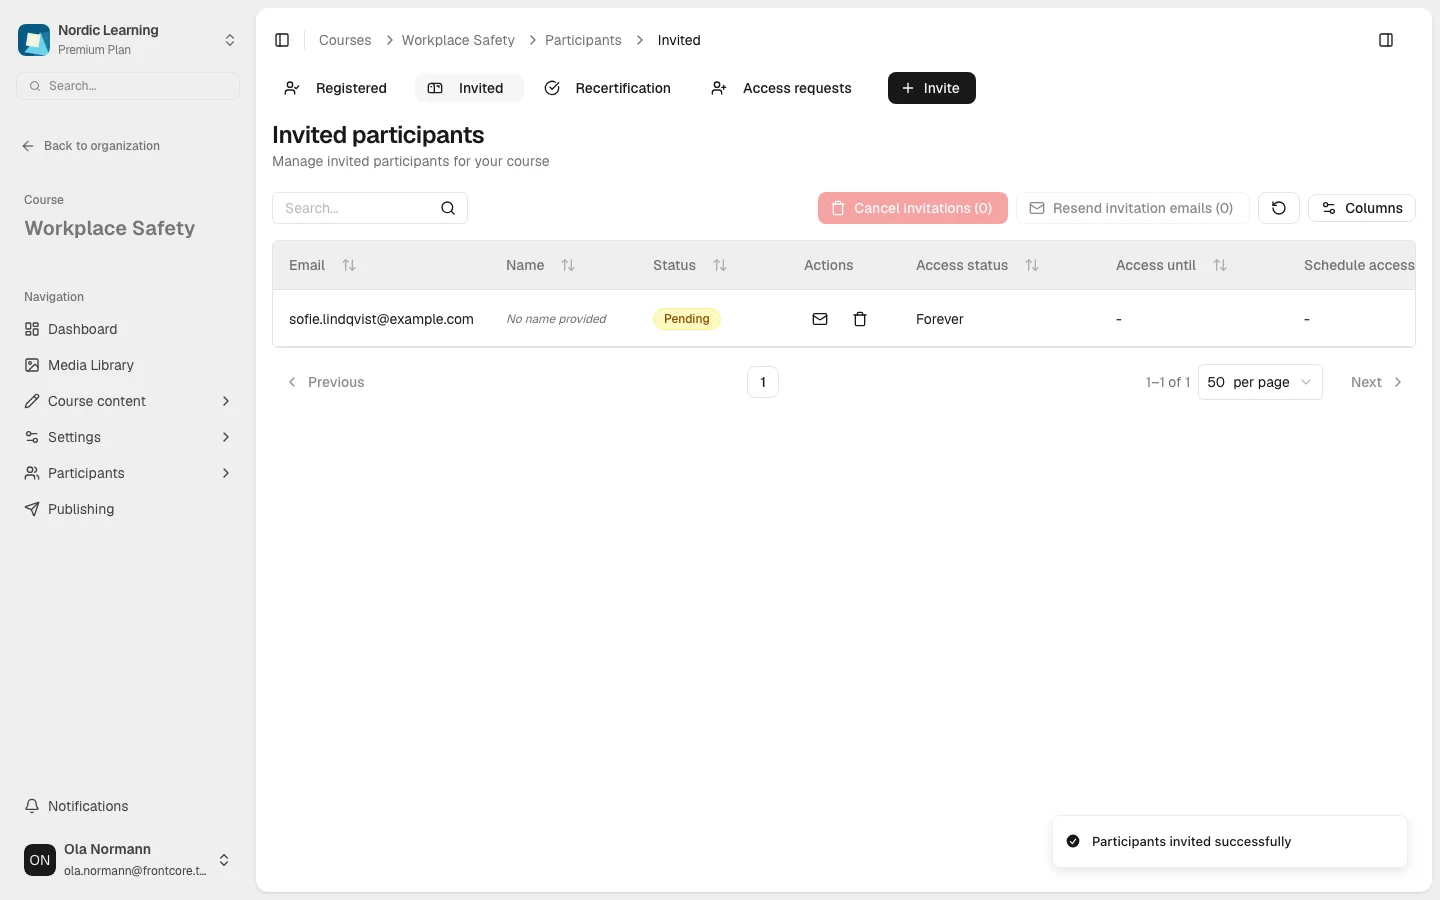
Select one or more rows to Resend invitation emails or Cancel invitations in bulk. The same two actions are available per row as icon buttons in the Actions column.
Despite the button reading Cancel invitations, cancelling removes the invitation from the Invited tab entirely rather than leaving a cancelled row behind to review. There's no view anywhere in the product to look up an invitation after you've cancelled it.
The Registered tab
Lists everyone actively enrolled. Use the Columns button to choose which of these show (some, like Certification Cycle or Time limit status, only appear when the relevant course feature is enabled):
Name, Email, Access status, Enrolled at, Access until, Completed on, Time limit status, Attempts, Course Completed, All sections completed, Exam status, Number of exam attempts, Progress, Certification Cycle, Feedback.
Per row, the Actions column offers:
- View participant details — opens the participant's detail page (below).
- Edit participant — edit their access settings.
- Send reminder — only shown for participants who haven't completed the course and have an email address.
A Show preview users toggle reveals the participant records created when an org member previews the course as a participant, hidden by default so they don't clutter your real participant list.
A participant's detail page
Click the eye icon on any Registered row to open a single participant's full detail page.
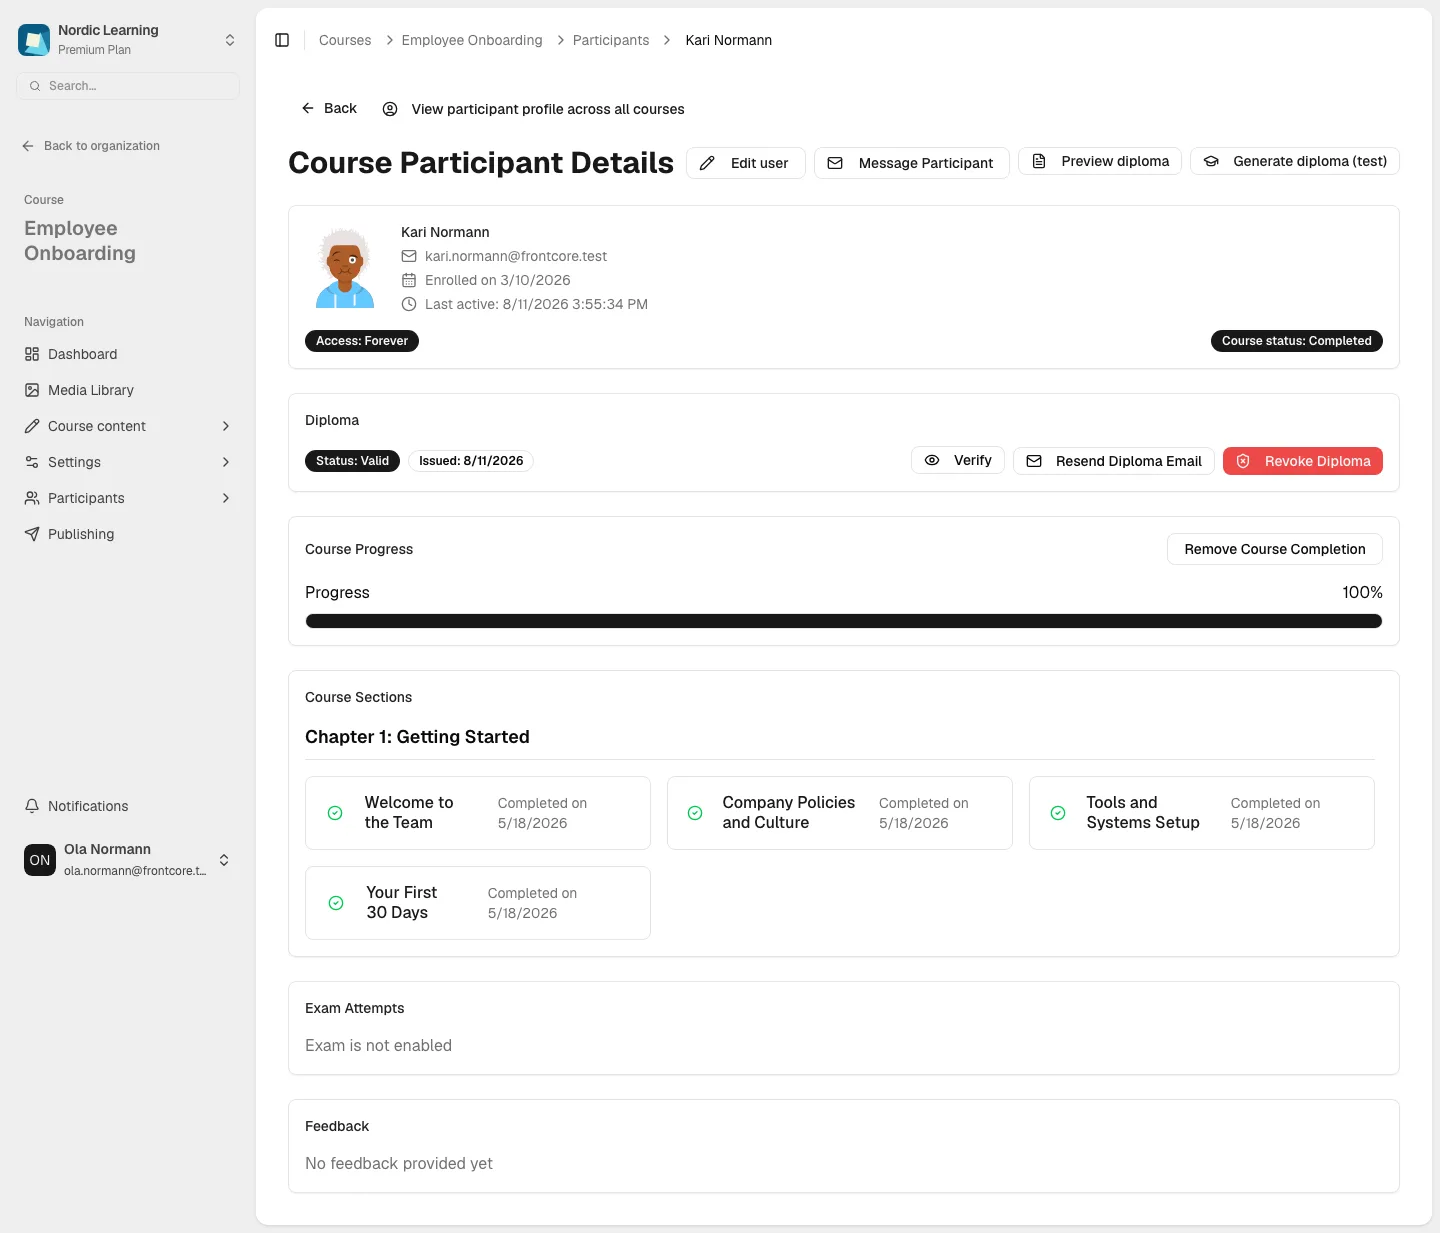
The header reads Course Participant Details, with Edit user, Message Participant, Preview diploma, and Generate diploma (test) actions. Below that:
- A profile card: name, email, Enrolled on, Last active, Access (and Access until, if the access type is Date), and Course status.
- A Diploma card once one has been issued — status, issue date, and Verify. While the diploma is Valid you also get Resend Diploma Email and Revoke Diploma; once it's revoked or expired, Reinstate Diploma takes their place. Download PDF appears only if the issued diploma has a resolvable download URL.
- Course Progress — a percentage bar (or the external package's own status, for SCORM/cmi5 courses).
- Course Sections — every section, grouped by chapter, with its completion date.
- A Course Time Limit card, only if the course has a time limit enabled — status (Not Started / Active / Expired), attempt/cooldown settings, and a reset-timer action — plus an Attempt Statistics card (Attempts Used, Total Time, Avg Time/Attempt, and an Attempt Breakdown table) for the same feature.
- Exam Attempts — one row per attempt with its grade and pass/fail outcome, each linking to that attempt's detail.
- Feedback the participant left, if any.
- Subscription Details, only for participants who paid via Stripe.
A Remove Course Completion / Mark Course as Completed button can appear on the Course Progress card — it's a manual override available only to super admins and organizations with the matching feature flag, not a standard admin action.
If the course has more than one certification cycle (recertification is enabled and the participant has been recertified), tabs at the top let you switch between cycles — and, within a cycle, between attempts if the course has a time limit.
Next steps
- Approve or deny course access requests
- Set up course recertification
- View all participants across your organization
- Upgrade your subscription
- Sign in with a magic link — what an invited participant sees when they accept.